


Introduction
This is very important whenever we create an application—to think about how it should be structured so that we can seamlessly collaborate as a team. Everyone should be able to work on their own module independently and implement new features easily without breaking existing ones.
To achieve this, the first thing we focus on while setting up a project is its structure: how things are organized, where logic lives, and how different parts of the application are exposed.
In this article, we’ll explore a scalable Next.js folder structure designed for large applications. You’ll learn how to organize your codebase in a clean, maintainable way as the project grows, understand the purpose of each major directory, and see a best folder structure for large Next.js apps that helps improve readability, collaboration, and long-term scalability.
What “Scalable Architecture” Means in a Project
Before getting started, we should understand what the term scalable architecture means. When we build a large, production-grade application, we need to focus on several key aspects—how to maintain it over time, how multiple developers can work on it simultaneously, and how to manage shared concerns like common components, themes, and configurations.
This is where architecture comes into the picture. It plays a critical role from the very beginning of an application, and it’s something we should carefully plan during the initial setup of the project.
How the App Router Changed Project Structure
Before Next.js 13, routing in Next.js was handled using the Pages Router. In this approach, routes are created inside the /pages directory. To create a new route, you simply create a folder (or file) with an index.js, and that route becomes accessible in the browser.
By default, components in the Pages Router follow traditional React patterns and are rendered on the client side, although server-side rendering and static generation can be configured explicitly using functions like getServerSideProps and getStaticProps.
The App Router is the modern routing system introduced in Next.js 13. It uses the /app directory and provides a more structured and powerful way to build applications. To create a route, you create a folder inside the /app directory and add a page.js or page.ts file (for TypeScript projects). That folder automatically becomes a route.
The App Router is built on React Server Components (RSC), which allows pages and components to be rendered on the server by default. This improves performance by reducing the JavaScript sent to the client. It also introduces powerful features such as layouts, nested routing, streaming, and enhanced data fetching, making it ideal for building scalable and modern Next.js applications.
Next js project architecture
First take a look what is the next folder structure currently next js stable version is 16.1.0,
Installation
Setting up a Next.js application is very straightforward. You just need to run the official setup command, and you’ll have a brand-new project ready to start building right away.
npx create-next-app@latest e-comm --yes
cd e-comm
npm run dev
Now that the setup is complete, it’s important to understand that Next.js is a framework built on top of React, and it follows a set of rules and conventions—especially when it comes to file and folder structure.
These conventions define how routes are created, how layouts are organized, and how different parts of the application interact with each other.In the code block below, you’ll see a basic Next.js folder structure. After that, I’ll walk you through each folder and explain its purpose so you can clearly understand how everything fits together.
e-comm/
├── .next/                  # Next.js build output
├── node_modules/           # Dependencies
├── public/                 # Static files
│   └── images/             # Image assets
│   └── icons/              # Icon assets
├── src/
│   ├── app/                # App router pages and layouts
│   │   ├── layout.tsx      # Root layout
│   │   └── page.tsx        # Home page
├── .env                    # Environment variables
├── .gitignore
├── next.config.ts         # Next.js configuration
├── package.json
├── package-lock.json
├── postcss.config.mjs     # PostCSS config
├── tailwind.config.ts     # Tailwind CSS config
└── tsconfig.json          # TypeScript config
As you can see above when we install a next app if you open in any IDE you will get these file in you project, let's see what all these files -
.next/– Contains the build output generated by Next.js during development and production.node_modules/– Stores all project dependencies installed via npm.public/– Holds static assets like images and icons that are directly accessible in the browser.src/– The main source directory where your application code lives.app/– Implements the App Router, defining routes, layouts, and server components.layout.tsx– The root layout shared across all pages, used for global UI like headers and footers.page.tsx– The entry page for a route; in this case, it represents the home page..env– Stores environment-specific variables such as API keys and secrets.next.config.ts– Configuration file to customize Next.js behavior.postcss.config.mjs– Configuration for PostCSS, often used with Tailwind CSS.tailwind.config.ts– Tailwind CSS configuration for design tokens and utilities.tsconfig.json– TypeScript compiler configuration for the project.
Next.js App Router File Conventions
As I discussed above, page.jsx|tsx is used to create a route which expose a route one which user can access the page, next js provides variaty of othere file which we can use to do several things like -
-
The
layoutfile is used to define shared UI across multiple pages, such as headers, footers, sidebars, or navigation. When you create alayout.tsx(orlayout.jsx) inside theappdirectory, it automatically wraps all the child routes present within that directory.A layout defined at the root level (
app/layout.tsx) acts as the root layout and wraps the entire application. This is typically where you place global UI elements like the main header, footer, global styles, and providers.You can also create nested layouts. For example, if you have an
adminfolder inside theappdirectory, adding alayout.tsxinsideapp/adminwill apply that layout only to the routes under theadminsection. All pages inside theadminfolder will share this layout, while the rest of the application remains unaffected. -
The
pagefile is used to define a route on which our ui will render, like/aboutfor this just create a folder name about inside app andpage.tsxinside now you can access it. -
The
loadingfile is used to define a fallback ui which shows immediately when user navigate a route, this is used to improve User experience, as data loaded original component swap it with proper content. -
The
not-foundfile is used to define a custom 404 UI. Whenever a route does not exist ornotFound()is triggered inside a page or layout, Next.js automatically renders this file.
You can create it at the root level to handle global 404 pages or inside a specific route folder to scope it to that route only -
The
errorfile is used to handle runtime errors that occur inside a route segment. If an error happens while rendering a page or layout, Next.js catches it and displays the UI defined in this file instead of breaking the entire app.
This file works at the route level and helps isolate errors to specific parts of the application. -
The
global-errorfile is used to handle application-wide errors. Unlikeerror.js, which is scoped to a route segment, this file catches errors that occur at the root level of the app.
It is typically placed at the root of theappdirectory and acts as a final fallback for unexpected crashes. -
The
routefile is used to create API endpoints in the App Router. Instead of rendering UI, it handles HTTP requests likeGET,POST,PUT, andDELETE.
This allows you to build backend APIs directly inside your Next.js application without needing a separate server. -
The
templatefile is similar to a layout but with one key difference—it re-renders on every navigation.
It is useful when you want shared UI but need the component to reset its state each time the user navigates between routes. -
The
defaultfile is used as a fallback UI for parallel routes. When a parallel route is not active or available, Next.js renders thedefaultfile instead.
This helps ensure a smooth user experience when working with advanced routing patterns.
Note: All files above we can add .tsx .jsx or .js extension to create file.
Atomic Design Pattern for Scalable UI
The name atomic when we heared about it we something remember related to chemistry the atoms, molecules and all, it is like that but not the though as that subject which we read in schools.
when we implement this design pattern we basically breakdown our app in four folders -
- atoms
- molecules
- organisms
- templates
why we breakdown in thsese specific and what is the meaning of these let's discuss one by one
Atoms
If you remember from school, our teachers taught us in chemistry that atoms are the basic building blocks of matter—everything around us is made of atoms. The idea is very simple and easy to understand.
We use the same concept in Atomic Design. Here, atoms represent the smallest and most reusable units of our application. These components cannot be broken down further and usually don’t depend on other UI components.
That’s why we keep them inside an atoms folder.
Let’s take an example.
A simple button, input field, label, or icon can be considered an atom. On their own, they don’t do much, but they are extremely important. When we start combining these small pieces, they form bigger and more meaningful components.
For example, a button atom can be reused across the entire application—in forms, modals, headers, or hero sections—without rewriting the same code again and again. This makes our UI more consistent and easier to maintain.
Atoms focus on one single responsibility and are designed to be highly reusable. Once atoms are well-defined, building larger UI blocks becomes much easier and more scalable.
Molecules
Now let’s move one step ahead.
If atoms are the smallest units, then molecules are created by combining atoms together. Individually, atoms don’t do much, but when they work together, they start making sense.
For example, if we combine:
- an input atom
- a button atom
- and maybe a label atom
we get a search bar. This search bar is now a molecule.
A molecule has a specific purpose and is still reusable, but it is more meaningful than a single atom. That’s why we usually keep such components inside a molecules folder.
Molecules help us avoid repeating the same combinations again and again throughout the app.
Organisms
Now, when we combine multiple molecules and atoms together, we get organisms.
Organisms are larger UI sections that start to look like real parts of a page. They are more complex and usually represent a complete section of the UI.
For example:
- a logo atom
- a menu molecule
- a search bar molecule
- a login button atom
When all of these come together, they form a header. This header is an organism.
Organisms are not as reusable as atoms or molecules, but they are still shared across multiple pages. That’s why we keep them inside an organisms folder.
At this level, our UI becomes more structured and closer to real product design.
Templates
Templates define how the page is structured, Think of templates as wireframes or blueprints. They arrange organisms on the page but don’t care about actual content.
For example, a hero section template might define:
- where the header goes
- where the main banner goes
- where the call-to-action section appears
But it doesn’t define the exact text or images.
Templates help maintain consistency across pages and make it easier to change layouts without touching business logic. That’s why templates usually live inside a templates folder.
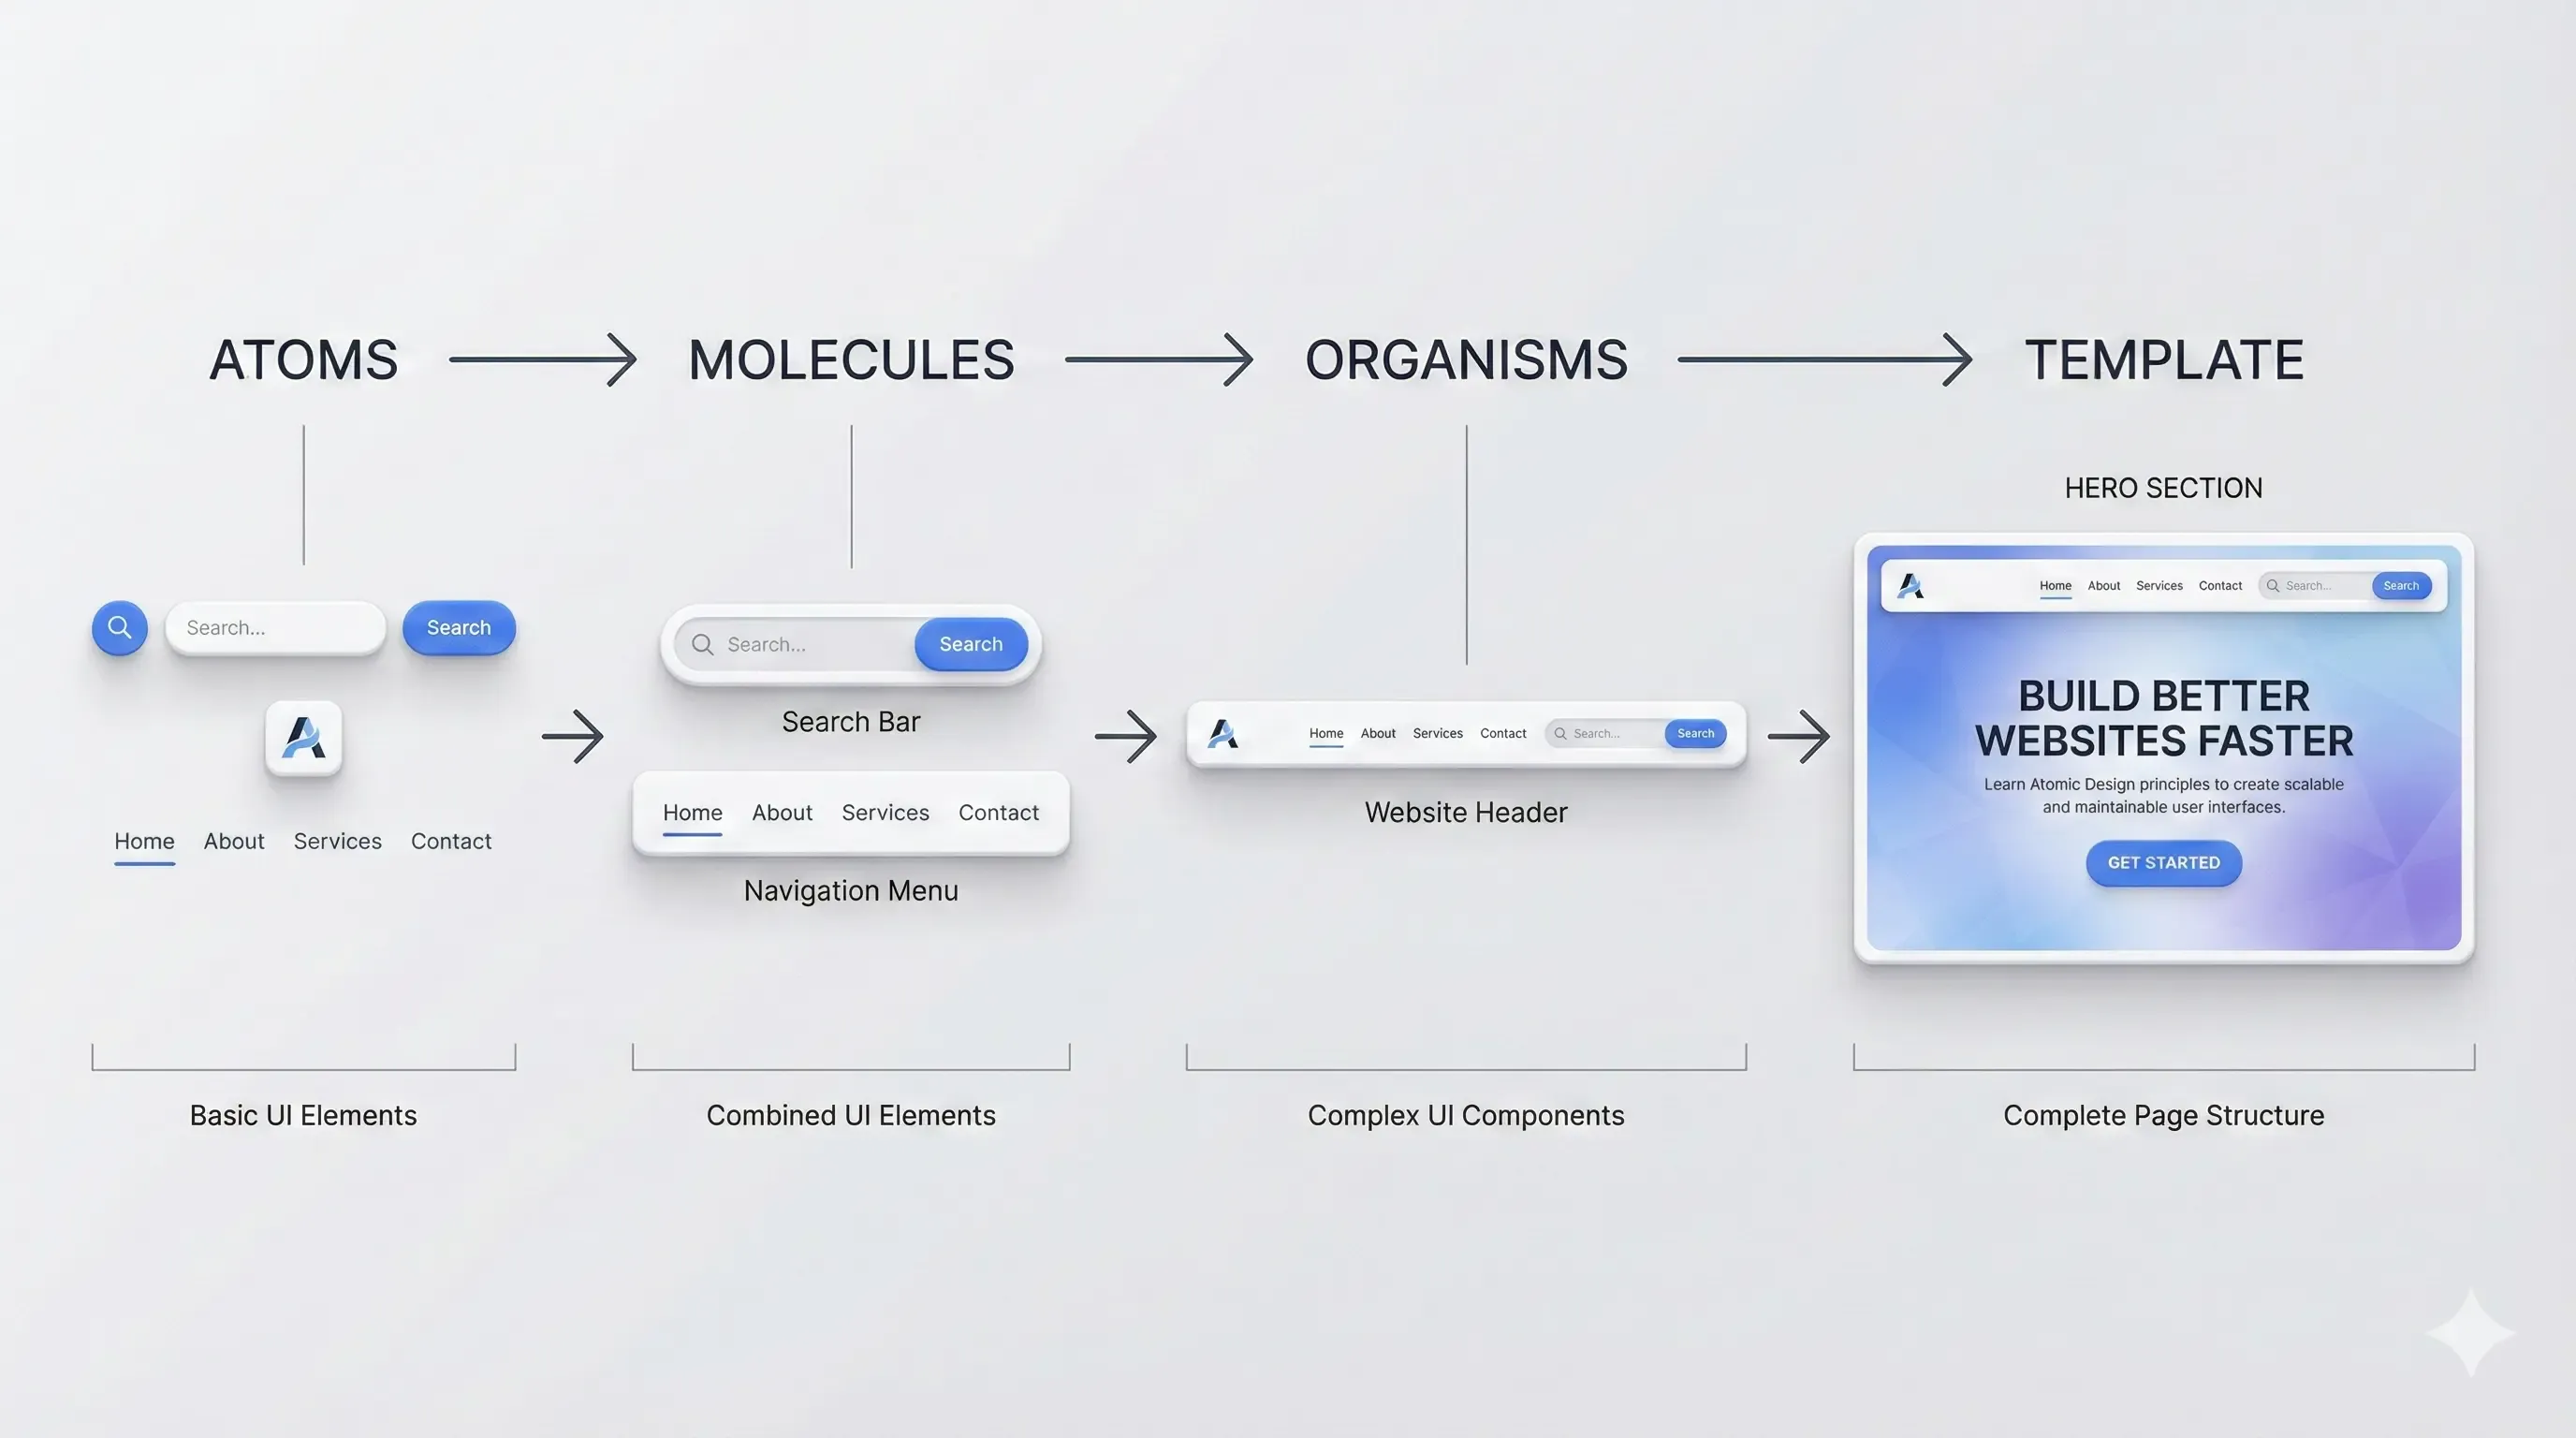
Above, we discussed what the Atomic Design pattern is and how it helps us break UI into small, easily manageable components. There are no hard and fast rules here—Atomic Design is more of a way of thinking than a strict convention.
The idea is to organize components into layers, where each folder has its own characteristics and responsibility. How you break down the UI and place components into these folders ultimately depends on the developer’s understanding and design approach.
When applied thoughtfully, Atomic Design helps improve reusability, maintainability, and overall code organization, making it easier to manage and scale the application over time.
Using shadcn/ui with Atomic Design
In all my projects, I use shadcn/ui as the component library, so the obvious question is—how do we leverage shadcn with Atomic Design? I’ll explain my approach here.
Whenever I set up a new project, the first thing I do is create a designs folder. Inside this folder, I keep my Atomic Design structure—atoms, molecules, organisms, and templates. This becomes the foundation for all UI-related code.
After that, I set up shadcn/ui. During the setup, shadcn generates a components.json file in the project root, alongside package.json. This file contains important configuration details, such as the theme used by components, the installation path for generated components, and other metadata required by shadcn.
In my approach, I treat all shadcn components as atoms. To support this, I configure the installation path in components.json so that whenever I run the shadcn install command, the components are generated directly inside the atoms folder. Once installed, these components can be imported and used anywhere in the project.
On top of these atoms, I then build molecules and organisms by composing multiple shadcn components together. This keeps the base components clean, reusable, and consistent, while higher-level components handle structure and business logic.
As I mentioned earlier, Atomic Design is not a strict rule—it depends on the developer’s mindset and project needs. I personally prefer keeping all shadcn components as atoms, but you can adapt this approach in a way that makes more sense for your team or application.
I’ve also shared a GitHub repository that includes this initial setup, which you can use as a starting point for your own projects. Make sure to go through it to understand how everything is wired together.
Managing Business Logic & Services
While UI components are an important part of the architecture, a scalable application also needs a clear structure for handling API calls, business logic, shared utilities, custom hooks, and TypeScript types. Organizing these concerns properly helps keep the codebase clean, maintainable, and easy to scale.
Check below folder structure -
e-comm/
├── .next/                  # Next.js build output
├── node_modules/           # Dependencies
├── public/                 # Static files
│   ├── images/             # Image assets
│   └── icons/              # Icon assets
├── src/
│   ├── app/                # App Router (routes, layouts)
│   │   ├── layout.tsx      # Root layout
│   │   └── page.tsx        # Home page
│   ├── designs/            # Atomic Design system (UI only)
│   ├── services/           # API calls, server actions
│   ├── hooks/              # Custom React hooks
│   ├── lib/                # Helpers, config, utils
│   └── assets/             # App-level assets (if needed)
├── .env                    # Environment variables
├── .gitignore
├── next.config.ts          # Next.js configuration
├── package.json
├── package-lock.json
├── postcss.config.mjs      # PostCSS config
├── tailwind.config.ts      # Tailwind CSS config
└── tsconfig.json           # TypeScript config
If you look at the folder structure above, you get a clear idea of how the project will look after the setup is complete. Each folder has a specific purpose, which makes the code easy to understand and easy to manage as the app grows.
The designs folder is only for UI components. The services folder is where we write API calls and server-related logic. All custom React hooks are kept inside the hooks folder, and common helper functions and configuration files are placed in the lib folder.
The assets folder is used for files that are part of the app itself, while the public folder is only for static files like images and icons that need to be accessed directly in the browser. Keeping these things separate helps the team work faster and keeps the project clean.
for api calls we can use react-query here to manage things easily.
Common Mistakes to Avoid
Sometimes developers write code in a way where everything is placed inside a single file or component. This makes the code messy, hard to manage, and difficult to debug. To avoid this, we should follow the Single Responsibility Principle.
But what does that mean in practice? Let’s take an example. Imagine a page where you need to show a list of blog posts or products with pagination. A junior developer might put all the logic—data handling, UI rendering, and pagination—into one large component. Over time, this file grows very big, becomes hard to read, and fixing bugs becomes challenging.
A senior developer, on the other hand, would break this into smaller, focused components. One component would only handle rendering the list (for example, ListRenderer). Another component would be responsible for showing a single card and handling user interactions. A third component would manage pagination, such as page numbers and next/previous buttons.
This approach keeps each component simple, easy to debug, and reusable. Components like ListRenderer and Pagination can then be reused in other parts of the application whenever needed.
Final Thoughts
A good folder structure is not about following strict rules—it’s about keeping your code clear and easy to understand. When your project is well organized, teams can work faster, add new features with confidence, and debug issues without confusion.
Using Atomic Design together with the Next.js App Router creates a strong foundation for building scalable applications. This combination helps you keep UI components clean, separate responsibilities, and grow your app without making the codebase messy.
Start with a simple structure, and scale it step by step as your application grows. Avoid over-engineering in the beginning, but make thoughtful decisions that won’t block you later.
By following these practices, you’re not just building for today—you’re future-proofing your Next.js application for 2026 and beyond.

Written by
Deepak Verma
I'm Deepak Verma, I transform complex problems into elegant, efficient, and scalable solutions. With over 4+ years of experience, I build modern web applications that deliver exceptional user experiences.


